

Reports dashboard
Open Reports from the left navigation in Workspace view. The page title is Reports.
Use Create Report to add a new report. Search and Tags filter the dashboard table. Click a Campaign or Website report row to open its management panel. Script Lift rows open the report directly.
Campaign tab columns
- Campaign (report name)
- Associated Campaign (linked campaign)
- Tags
- Created (date and author)
What a Campaign report shows
A Campaign report is a performance table for a single active campaign. You choose dimensions (breakdowns) and metrics (measures) from the campaign reporting catalog, set a date range, sort columns, and download CSV data. The header title follows:{report name} – Campaign Performance Summary.
The builder has no separate chart or summary-tile views. The main surface is the data table and a totals row for selected metrics.
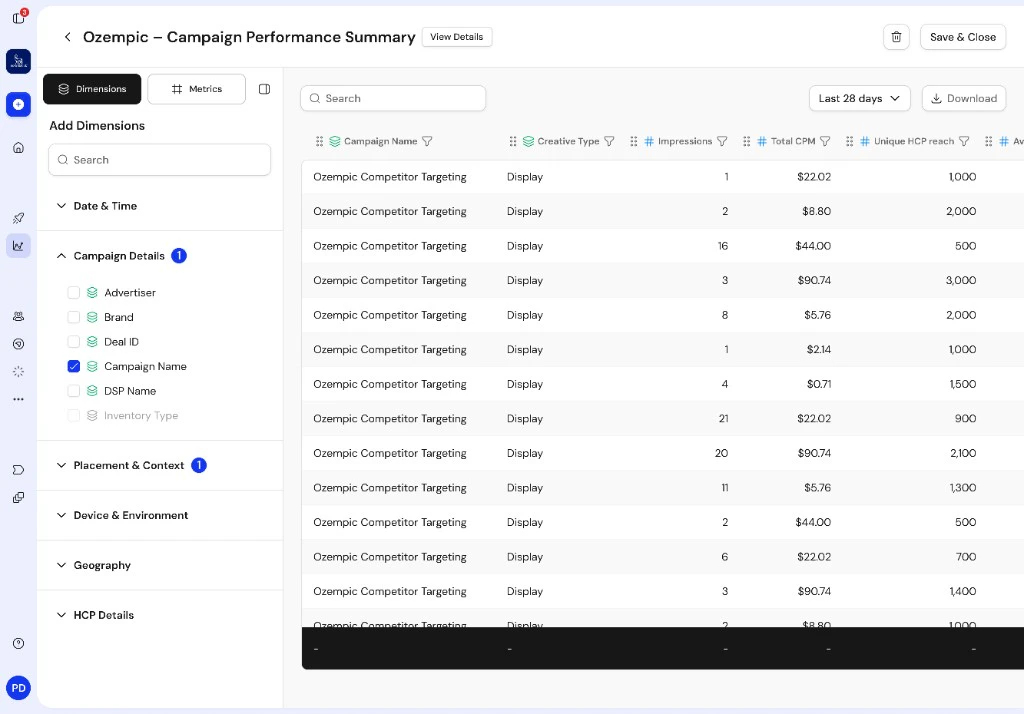
Example Campaign report builder layout (illustrative mockup). Your report name, campaign, and data will differ.
Create a Campaign report
The only way to create a Campaign report is from Reports.1
Open Create report
In Workspace view, go to Reports and click Create Report.
2
Choose Campaign Report
On What are you looking to report on?, select Campaign Report, then click Continue.
3
Add report details
On Add your Campaign Report details, set:
- Report name
- Description (optional)
- Campaign (required): choose an active campaign
- Tags (optional)
Unlock paid Campaign fields (Script Lift)
Paid campaign dimensions and metrics require Script Lift Reporting & Offline Conversion Events on the campaign attached to the report. Turn on Script Lift Reporting & Offline Conversion Events in the Create Campaign Flow Reporting options step before you publish. You can also add it later. If the campaign is already published and you select a locked paid field in the report builder, Unlock campaign paid dimensions and metrics appears and turns the upgrade on for that campaign. That upgrade adds prescribing-related paid fields to the campaign catalog, such as Gross TRX, Gross NRX, New Patients, and New Prescribers. It also makes the campaign eligible for a Script Lift report once it is Active. For Script Lift report setup, see Create a Script Lift report. For paid fields on Website reports, see Website reporting.Paid dimensions and metrics
Wrango loads dimensions and metrics for Campaign and Website reports from the reporting catalog API (/reports/dimensions-and-metrics). Each item includes a display label, grouping category, internal key, and a paid flag.
Fields marked paid show a Paid Feature tag in the dimensions and metrics panel.
When paid fields are available
If the upgrade is off
- Website report linked to a pixel with PLD Resolution off: paid fields are not available in the catalog.
- Campaign report linked to a campaign with Script Lift Reporting & Offline Conversion Events off: paid fields are not available in the catalog.
- On a Website report, Unlock website paid dimensions and metrics enables PLD Resolution on the attached pixel.
- On a Campaign report, Unlock campaign paid dimensions and metrics enables Script Lift Reporting & Offline Conversion Events on the attached campaign. The campaign has to be published already.
Pixel and Campaign reporting
- Website reporting is based on a pixel you select when you create the report. Active and Inactive pixels can both be used.
- Campaign reporting is based on an active campaign you select when you create the report. It does not use a pixel ID to load performance rows.
Dimensions and metrics catalog
The platform groups fields by category in the left panel. Each field shows a Paid Feature tag whenpaid is true in the catalog.
Dimensions
Metrics
Paid metrics (Script Lift)
When Script Lift Reporting & Offline Conversion Events is on for the report’s campaign:
Exact keys and categories come from the catalog response for your workspace.
Manage a report
Clicking a Campaign or Website report row on Reports opens a side panel, the same pattern used for audiences. Use it to review and update the report without opening the builder. The panel shows the report Type, Created date and author, and Open, which takes you into the report builder.
Discard changes and Save appear once you change something.
Change the data source
You can point an existing report at different data instead of rebuilding it. Choose another campaign or pixel, then Save. Wrango asks you to confirm with Change report data source? before the change is applied. Your saved dimensions, metrics, and filters are kept, and the report pulls from the new source the next time you open it. Cancel to keep the original source.- Campaign reports can only use an active campaign.
- Website reports can use an active or inactive pixel, since an inactive pixel still holds historical data worth reporting on.
Report builder layout
Header
- Back control
- Title with Campaign Performance Summary
- View Details
- Save & Close
Dimensions and metrics panel
- Dimensions and Metrics tabs
- Search filters field labels in this panel (operational today)
- Accordion groups by catalog category
- Count badge on each group for selected fields in that group
- Paid Feature tag on gated fields
- Resizable panel (drag the right edge)
Table area
- Date range (default: last 28 days through today)
- Quick Selections: Last 28 days, Last 90 days, and Last 365 days
- When Activity Date Time is selected as a dimension, the filter also includes Time (UTC) for more precise start and end values
- Download (CSV)
- Data table with reorderable columns. Sorting is available on the columns that support it; the others show Sorting not supported for this column
- Column filter on Date and Day of Week (calendar range); other columns show Filter coming soon
- Search filters the table once at least one dimension is selected. When nothing matches, Wrango shows No results for your search term with a Clear search control
- Infinite scroll
- Totals row for selected metrics when metrics are selected